I’d had my eye on a Sonos System for a while but was turned off by it’s price, lack of speaker options, and lack of inputs. I started looking for alternatives but was underwhelmed. The best of the rest was the Logitech Squeezebox system. Squeezebox is a network music player supported by Logitech developed hardware. It is also supported by standalone applications that can run independently of Logitech systems.
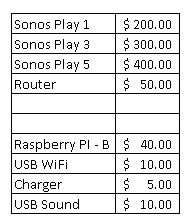 This feature alone sold me. I could build a handful of mini-computers, each powering an amplifier and speaker of my choice. The Sonos Play 1 with its single networked speaker (ignoring the router) costs about $200. I estimated that a mini-computer running Squeezebox would cost about $65, leaving $135 for the speaker, amplifier, and enclosure. My goal was to shoot for equivalent cost and performance with a custom enclosure/speaker setup.
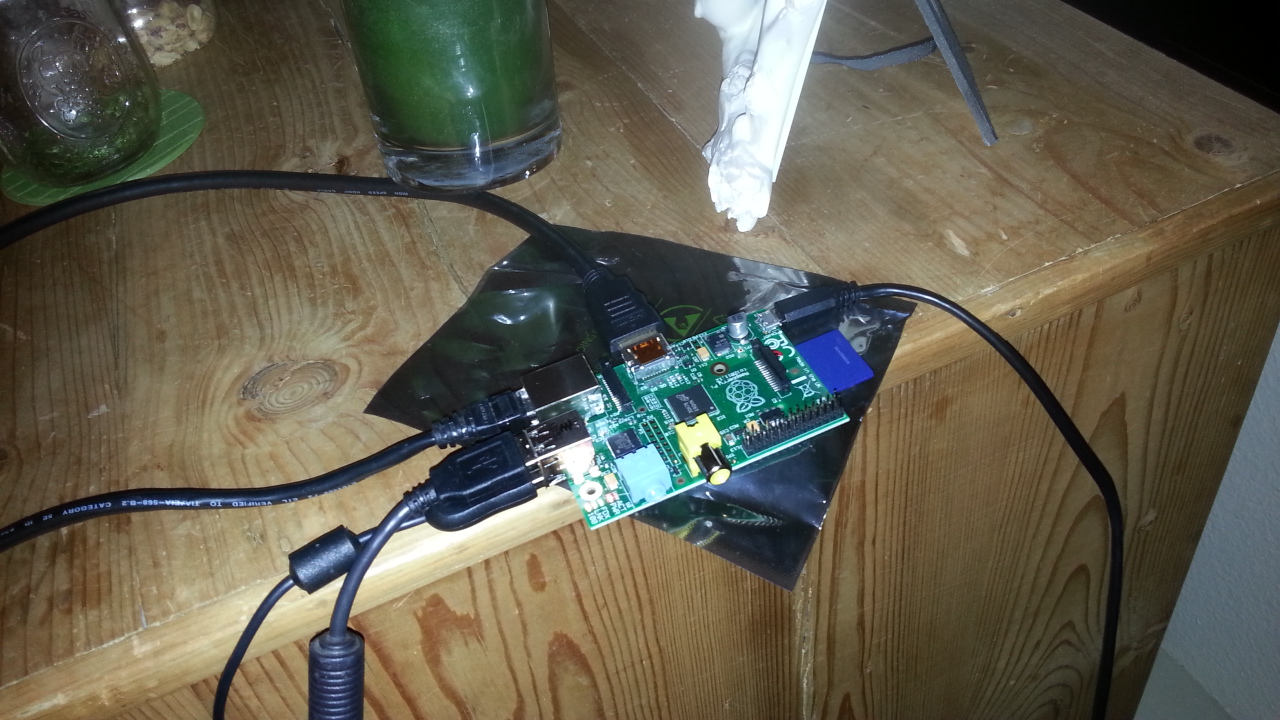
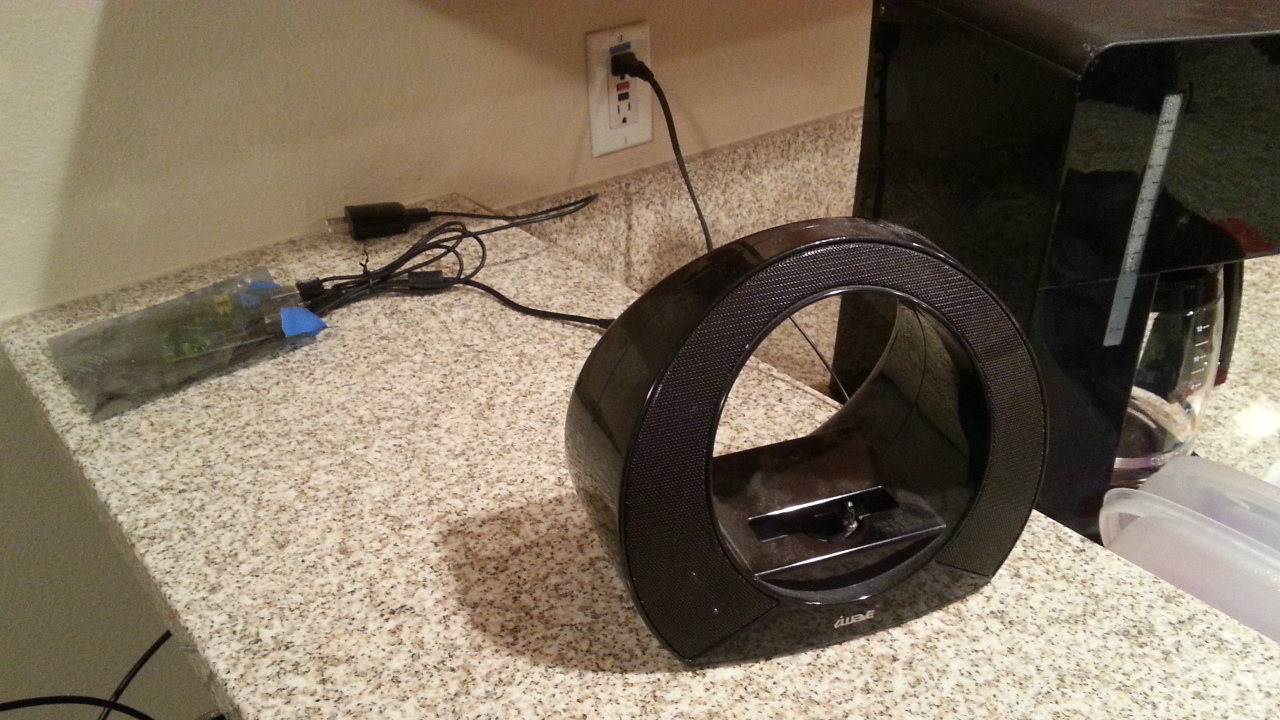
I started the research phase by looking for similar projects and browsing online posts. Once I had a plan, I made a parts list and started getting components to build a proof of concept. I ordered a Raspberry Pi B with a USB Wi-FI and Sound card. I used an iHome iPod speaker dock as the amplifier and speaker.
I got the system to work great but when I added a second speaker there were significant problems keeping everything in sync. The challenge, I found, was that the different hardware and manufacturing tolerances cause the audio to be produced at slightly different times. Sonos has figured this out and their products do not experience this problem. I eventually caved and purchased a modest Sonos system for my apartment.
The following section details the steps I took to set up the server and the Raspberry Pi. Even though it didn’t work for me it might work for someone else.
Overview
You’ll first need a computer to act as a server for your media and to provide access to online content. Logitech Media Server will be installed to provide this function. Then the Raspberry Pi needs to be setup with an operating system that can run Squeezelite, a Logitech Media Server client. A WiFi adapter and sound card can be added for additional or improved functionality. When the setup is complete you should be able to play any local and most online audio content.
Setting up Logitech Media Server (LMS)
Download LMS (http://mysqueezebox.com/download) and install. Create an account. Leave LMS running on your computer whenever you want to be able to access your media.
Setting up Raspberry Pi
Equipment
- Raspberry Pi B, 700 MHz (Amazon link)
- SD Card, Sandisk 4GB Class 4 (Amazon link)
- USB WiFi Dongle, Asus USB-N10 (Amazon link)
- USB Sound card, AFUNTA Sound Adapter (Amazon link)
- Monitor
- Mouse
- Network cable
- Micro-USB (for power)
SD Card and initialization
We’ll use the NOOBS (New Out Of the Box Software) installer to load the Raspbian operating System. It can be downloaded at https://www.raspberrypi.org/downloads/noobs/.
Format an SD card using the built-in Windows utility. Drag the downloaded NOOBS package into the formatted SD card.
Once the transfer is complete, insert the card into the Raspberry Pi. Hook up the monitor, mouse, keyboard, and network cable to the Raspberry Pi and provide power. When it turns on NOOBS will load.
The initial username/password is pi/raspberry. Change it from the default.
$ passwd
Reboot and login with the new password
$ sudo reboot
Assign a host name and password. Enter the address, subnet mask, and gateway for your router.
Set the keyboard. There are other settings but we can ignore those.
Load the GUI
$ startx
Open LXterminal and type:
$ sudo apt-get update
$ sudo apt-get upgrade
Wireless internet access
Power the Raspberry Pi down. Insert the USB WiFi dongle. Restart.
Set static IP and WiFi settings. First check the available network interfaces.
$ cat /etc/network/interfaces
Look for the line that reads “iface eth0 inet dhcp”. This means that the built in network interface connects to the internet using DHCP.
Open the interfaces configuration and edit the file using nano.
$ sudo nano /etc/network/interfaces
The existing configuration should look something like this:
auto lo

iface lo inet loopback
iface eth0 inet dhcp

allow-hotplug wlan0
iface wlan0 inet manual
wpa-roam /etc/wpa_supplicant/wpa_supplicant.conf
iface default inet dhcp
Replace it with the following configuration. One tidbit I found useful was that the broadcast is the address with 255 for the last octet. The network is the address with 0 for the last octet. Fill in the “xxxxx” entries below with your specific information.
auto lo

iface lo inet loopback
iface eth0 inet dhcp

allow-hotplug wlan0
auto wlan0

iface wlan0 inet static
address 192.168.1.XXX
netmask 255.255.255.0
network 192.168.1.0
broadcast 192.168.1.255
gateway 192.168.1.1
wpa-ssid “xxxxxxxxxxxxxxx”
wpa-psk “xxxxxxxxxxxxxxxx”
Reboot
$ sudo reboot
Check to make sure the changes have stuck
$ ifconfig
Audio setup
Check the soundcard and volume level. You may want to add a USB sound card as the onboard device is inadequate for high quality audio playback.
$ sudo alsa
Set any microphones to 0. Set the volume of the ALSA card to 45 (or whatever number).
Installing Squeezelite
We’ll be running Squeezelite on our Raspberry Pi. It’s a LMS client that does not have a user interface (headless) and must be controlled by the web interface or another client. The libraries can be installed by typing the following:
$ sudo apt-get install -y libflac-dev libfaad2 libmad0
Create a squeezelite work directory. Download squeezelite.
$ mkdir squeezelite
$ cd squeezelite
$ wget http://squeezelite.googlecode.com/files/squeezelite-armv6hf
Move the downloaded file to the usr directory and make it executable.
$ sudo mv squeezelite-armv6hf /usr/bin
$ cd /usr/bin
$ sudo chmod u+x squeezelite-armv6hf
Audio on Squeezelite
Now let’s view the soundcards and make sure they are being recognized by squeezelite.
$ squeezelite-armv6hf -l
Here’s my output:
Output devices:
 null - Discard all samples (playback) or generate zero samples (capture)
 default:CARD=ALSA - bcm2835 ALSA, bcm2835 ALSA - Default Audio Device
 sysdefault:CARD=ALSA - bcm2835 ALSA, bcm2835 ALSA - Default Audio Device
 default:CARD=Set - C-Media USB Headphone Set, USB Audio - Default Audio Device
 sysdefault:CARD=Set - C-Media USB Headphone Set, USB Audio - Default Audio Device
 front:CARD=Set,DEV=0 - C-Media USB Headphone Set, USB Audio - Front speakers
 surround40:CARD=Set,DEV=0 - C-Media USB Headphone Set, USB Audio - 4.0 Surround output to Front and Rear speakers
 surround41:CARD=Set,DEV=0 - C-Media USB Headphone Set, USB Audio - 4.1 Surround output to Front, Rear and Subwoofer speakers
 surround50:CARD=Set,DEV=0 - C-Media USB Headphone Set, USB Audio - 5.0 Surround output to Front, Center and Rear speakers
 surround51:CARD=Set,DEV=0 - C-Media USB Headphone Set, USB Audio - 5.1 Surround output to Front, Center, Rear and Subwoofer speakers
 surround71:CARD=Set,DEV=0 - C-Media USB Headphone Set, USB Audio - 7.1 Surround output to Front, Center, Side, Rear and Woofer speakers
 iec958:CARD=Set,DEV=0 - C-Media USB Headphone Set, USB Audio - IEC958 (S/PDIF) Digital Audio Output
The second and third cards listed are the defaults. Since I added a USB sound card I’ll need to ask Squeezelite to use the front channel of the new card with a flag on the command. No flag is needed if the default sound card is used. The following flag will start Squeezelite with the new soundcard.
EXAMPLE:$ ./squeezelite-armv6hf -o front:CARD=Set
Running Squeezelite
We may want to start the Squeezelite player with a descriptive name otherwise it will just show up as “Squeezelite.” We can use the –n flag to add a name.
-n Kitchen
If the squeezebox server uses a static IP, it’s a good idea to set it on the Raspberry Pi. Changing the IP is pretty straightforward with the following command:
EXAMPLE:$ ./squeezelite-armv6hf -o DEV=0 192.168.2.4
I am using a DHCP so the Raspberry Pi can auto detect instead of manually changing the IP address. I’m going to leave it off and just start Squeezelite with the new soundcard and player name.
$ ./squeezelite-armv6hf -o front:CARD=Set –n Kitchen
The program will start without any output. It may appear to be locked up but it isn’t. To exit the program use the quit interrupt (Ctrl-C).
References
- http://www.engadget.com/2012/09/04/raspberry-pi-getting-started-guide-how-to/
- http://pingbin.com/2012/12/setup-wifi-raspberry-pi/
- http://www.raspberryshake.com/raspberry-pistatic-ip-address/
- http://learn.adafruit.com/adafruits-raspberry-pi-lesson-3-network-setup/setting-up-wifi-with-occidentalis
- http://www.raspberrypi.org/forums/viewtopic.php?f=38&t=25778
Confirm it works
Log into the computer running the Logitech Media Server. Open the Logitech Media Server Control Panel and select the Information tab. Confirm that the Raspberry Pi running Squeezelite is showing up and that the IP address is correct.
Setting up Spotify
Sign up for a premium Spotify account. They are currently hosting a one month trial that might be worth looking into. Go to the Logitech Squeezebox site, make sure the Spotify app is installed, and enter your account information.
Open up LMS. Click on the ‘Advanced’ tab and then the ‘Advanced Settings’ button in the Web Based Interface section. This will pull up the web interface in your default browser. Click ‘Plugins’ to open the list of plugins available to run on LMS. There is already a Logitech authored plugin for Spotify that is checked by default. I tried it but it had issues with not recognizing the file types of the songs on the Spotify server.
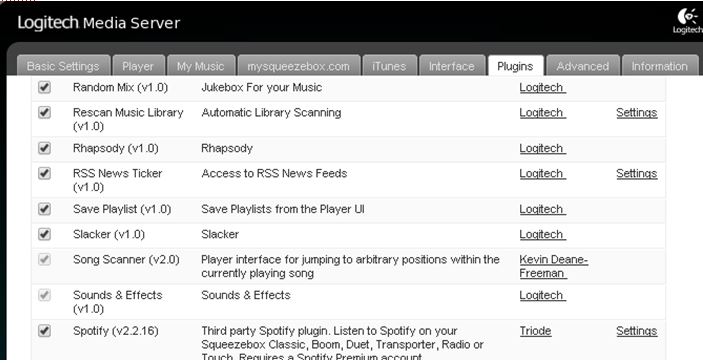
Scroll down to ‘Recommended 3rd Party Plugins.’ Find the Spotify plugin by Triode. Check the box. LMS will ask to restart the server but decline for now. Click on ‘Settings’ to the right of the Triode Spotify plugin.
Enter your Spotify username and password if it’s not in there. Then click the box to enable the helper. Regular Squeezebox players probably don’t need this but for some reason the Raspberry Pi does. Apply the changes and restart the server. Spotify should now work!
Working with Raspbian
Raspbian can be a bit tricky to work with but here are some tips to get you started
File and directory commands
- Tilde (~) stands for the home directory: /home/user
- pwd: print working directory
- ls: list files in current directory
- cd: change directories
- Navigate into the root directory: cd /
- Navigate to home directory: cd
- Navigate up one level: cd ..
- Navigate to previous: cd –
- cp: copy a file
- mv: move a file
- rm: delete a file
- man: show manual for specific commands
- ctrl+shift+v: paste command into Gnome terminal
- Up Arrow: Scrolls through previous commands
- Enter: Enters command
- Tab: Autocompletes commands
References
https://help.ubuntu.com/community/UsingTheTerminal
Program commands
- ./filename.extension: runs a file within a directory
- startx: starts the LXDE (Lightweight X11 Desktop Environment) GUI
- Ctrl-c: Interrupts a running program. Lower-level interrupt than kill. This is what I normally use.
- Ctrl-\: Quits a running program
- Ctrl-z: Suspends a running program
- Ctrl-u: Kill program
System commands
- sudo shutdown -h now: shuts down now. ‘Now’ could be replaced with a number to delay the shutdown or even a specific time.
- sudo shutdown -r now: restarts
References
Remote login
Remote login is a useful tool as it helps eliminate the need for a monitor, keyboard, or mouse. Download and install Putty (http://www.putty.org/) on the computer you want to login from.
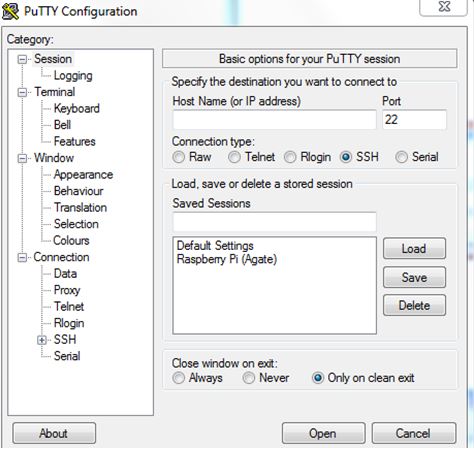
Type in the IP address of the Raspberry Pi. Be sure to use Port 22 and have SSH selected. Enter the username and password for the Raspberry PI to log in.
Auto Login
In the terminal enter:
$ sudo nano /etc/inittab
Scroll down to the portion of the files that says:
1:2345:respawn:/sbin/getty --noclear 38400 tty1
Comment out the line with a # as demonstrated below.
#1:2345:respawn:/sbin/getty --noclear 38400 tty1
Under the commented line add:
1:2345:respawn:/bin/login -f pi tty1 </dev/tty1 >/dev/tty1 2>&1
Control+X to exit, Y to save, press Enter twice.
Resources
Start Squeezelite on startup
There are several ways to do this but the simplest is to put a command in /etc/rc.local. Open up the file in the terminal:
$ sudo nano /etc/rc.local
Place the following line of text before “exit 0”. If you have a different path ensure that the full path is used. The ‘&’ symbol tells the bash shell to execute the program without waiting for it to complete allowing it to run in the background.
/usr/bin/squeezelite-armv6hf -o front:CARD=Set –n Kitchen &
Control+X to exit, Y to save, then press enter.
Resources